
Adobe Acrobat PDF
Portable Document Format (PDF) documents are the most common type of document on the website. They are easily shared and most people have the ability to open these types of files without additional software other than a PDF reader such as Acrobat Reader.
These types of documents are also more complex than standard Office documents. There are more things happening behind the scenes than standard documents. These are some steps to follow when dealing with PDF documents and making them accessible.
In order to make Adobe Acrobat documents accessible, Adobe Acrobat Pro is required. Instructions here are designed for Acrobat Professional DC.
Converting PDF from Other Applications
Most of the time PDF's are created from other applications such as Office or Google Docs. When creating a PDF for accessibility, make sure that the document is a tagged PDF.
Prior to converting the document to a PDF, make sure the document is fully accessible. This will eliminate a lot of the work when converting to a PDF. Once the document is made accessible, then convert the document to a tagged PDF.
For Windows Office 2010 and above
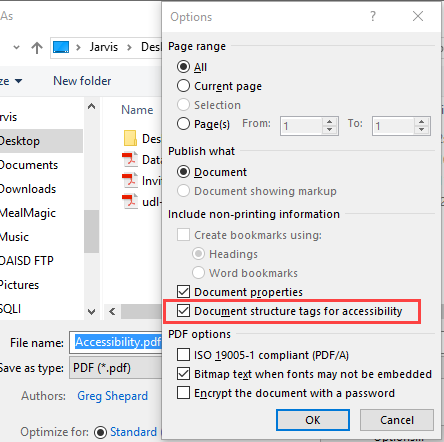
- Click File > Save As and choose where you want the file to be saved.
- In the Save As dialog box, choose PDF in the Save as type.
- Click the Options. Make sure the Document structure tags for accessibility is selected and then click OK.
For Macintosh Office
- Select File > Save As and choose where you want the file to be saved.
- In the Save As dialog box, go to File Format drop down box and choose PDF.
- Select the radio button "Best for electronic distribution and accessibility (uses Microsoft online service)".
First Steps to Take in Acrobat Pro
Make sure the document has recognized text
If the document has text, as most documents will, recognize text should be run first to make sure that all of the text becomes "readable".
From Acrobat Pro DC, choose Tools and select the Enhance Scans tool. Click on the Recognize Text button. Once the text is recognized, text can be corrected using the Correct Recognized Text from the Recognize Text dropdown list.

NOTE: This typically only needs to be done if a document is scanned from a scanner or copier. Creating a PDF this way only takes an image of the document. If a document already has renderable text such as converting a Word document, you will not be able to Recognize Text function and should be fine.
Verify that the document has been tagged
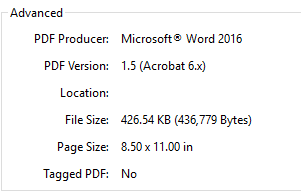
On the PDF document, right-click (Windows) or command-d (Macintosh) to display the Document Properties. Look towards the bottom of the dialog box and it will say Tagged PDF: Yes or No.
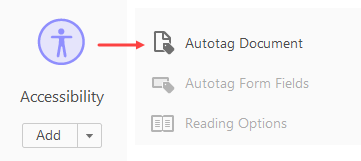
If the document is NOT tagged, then go to Tools > Accessibility and click the Auto Tag Document at the top of the Accessibility Pane.
Check the Reading Order
The reading order helps to determine how the document looks depending on how it is viewed. To check the Reading Order, go to Tools > Accessibility > Reading Order.
Edit the Alternative Text for Informative Images
For images in the document, each one should be set with Alternative Text (Alt Text). To set Alternative Text, go to Tools > Accessibility > Set Alternate Text.
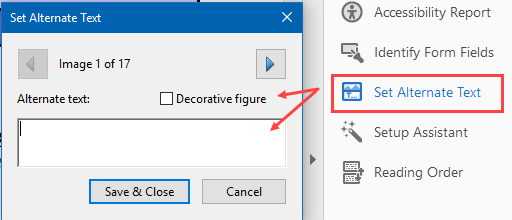
This will allow you to set Alternative Text for each of the images one by one. If the image is informational, then a good description of the image should be entered. If the image is purely decorative (such as a logo on the page), then the Decorative figure checkbox should be checked. This will set the Alternative Text to be null and not be important to the person reading the document.
Check Tables for Proper Setup
If the document contains one or more tables, check the tables to make sure that header rows are properly marked. To check the tables, do the following steps:
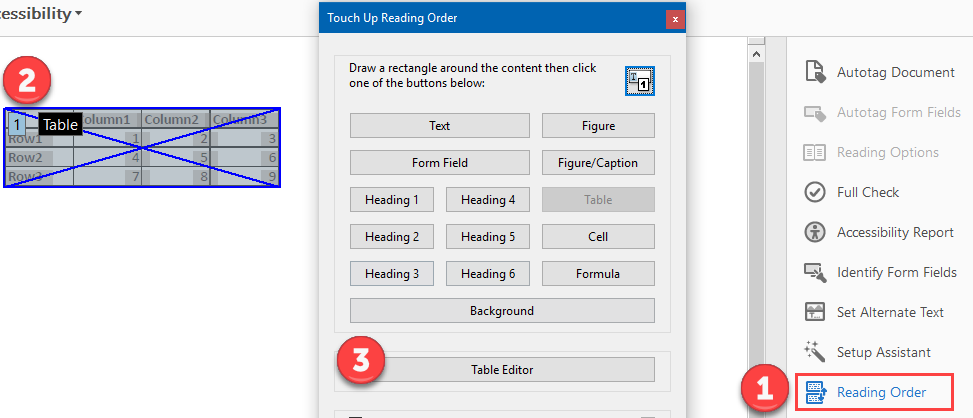
- Go to Tools > Accessibility > Reading Order
- Find the table to check and click on it. There should be a number in the upper left-hand corner of the object.
- Once the Table is selected, click on the Table Editor button in the dialog box. The table will appear with red lines.
- Right-click a cell and select Table Cell Properties....
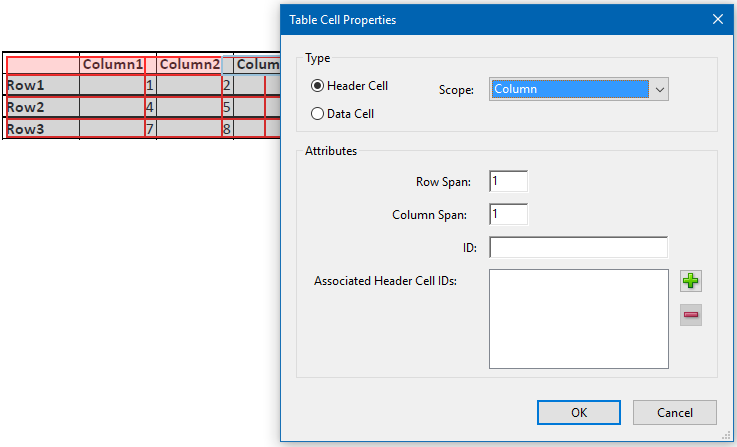
- Set the proper cell values for Headers or Data Cells.
- Click the big "X" to exit.
Check Headings for Accuracy
Look at the structure of the document visually to determine what the heading structure should be that makes the most sense for reading through the document. Keep in mind how a screen reader might read the document. Keep in mind the structure as the same as websites and documents of H1 through H6.
To check the tags, select View > Show/Hide > Navigation Panes > Tags.

Go through the tags and add, delete or rename tags as needed. For instance, the first tag on the page should be the title of the page and marked as H2 through H6 respectively as needed.
Using the Accessibility Tool for a Full Check
Once preliminary fixes are complete, you will want to run a Full Check using the Accessibility Tool. The Accessibility tool will go through the PDF document to check for issues in the document that need to be fixed. If the application used to create the PDF has been fixed prior to conversion, there should be fewer errors when working with Acrobat Pro to fix additional issues.
To run a full accessibility check, go to Tools > Accessibility and then click the Full Check button. There are a number of options that come up, but most of the time, just click Start Checking. The main option is to show where the report is saved if you want it saved so it can be retrieved.
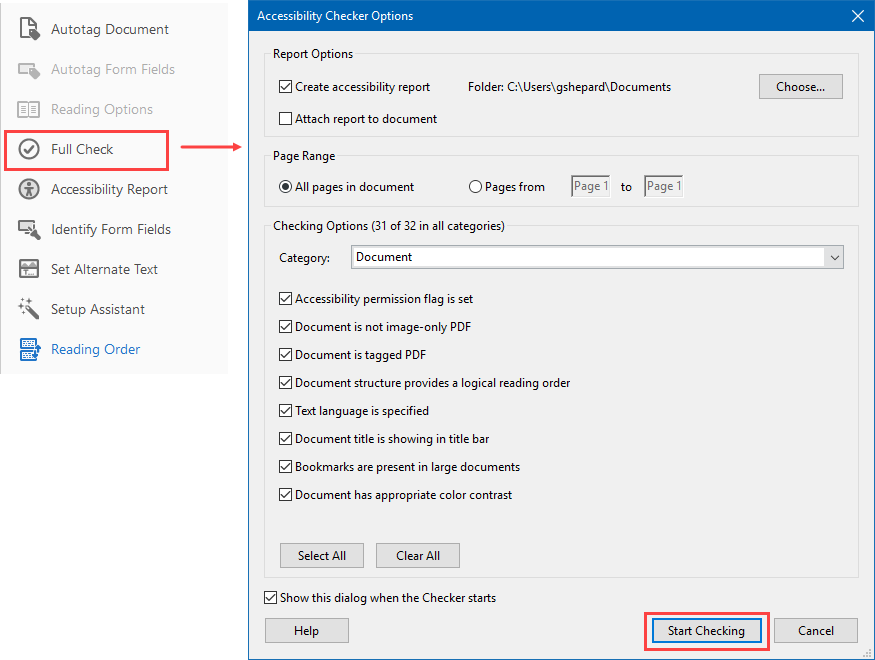
The full check will cover document issues, page content, forms, alternate text, tables, lists, and headings. There are 3 levels it will give feedback on. A green check means it passed. A blue question mark means it cannot test properly or doesn't know and a red "x" means failed. The next step is to work through each of those issues. If you right-click on each item in the results it will give options to:
- Fix - will generally help fix the issue or guide you in the right direction.
- Skip Rule - allows you to skip the rule and remove it from the check.
- Explain - this will explain the rule and take you to Adobe's website for more information.
- Check Again - checks the item again to see if it is fixed.
- Show Report - will show a full report of the errors and information on them.
- Options - this will display the options dialog box as when the Full Check was first run.
Work through each area and keep checking until there are no critical issues.